Thursday 6 December 2012

Sound Design Sound Clips

I decided I would have a play around and try and create numerous little sound clips at 30 seconds a piece as it's obvious that there are so many great sounds to play around with and alienate to create different soundtracks to match different moods and emotions but I just wanted to paint a different picture without using the image, for each musical sequence.

So first off we have "The Lost Transmission" which I created to resemble the vastness of space. I wanted to create the essence of huge scope, and how thing's get lost in that vast open space. I was heavily influenced by the natural transmissions that moons and planets create through sound waves and I enjoyed the idea of them been hidden and them developing their own sense of a history with time passing by, waiting to be found - so this is my first piece.


This next sound piece, while it doesn't meet the brief's 25 second demand, it does go on for quite a while, but I wanted to show that I had been playing around with the pitching and timing of various sound clips to create my own unique version of a flying saucer sound effect from an old 1950's science fiction film. Iv'e then tweaked and played around with a couple more sounds and altered the pich and timing to this rocket ignition/booster/taking off sound to compliment as a secondary sound to the initial UFO roar and created this unique take-off sound. 


 Then I have my Prehistoric/Jurrasic Jungle soundtrack


Sunday 18 November 2012

Han Solo Quote & Lip Sync

                                                            
                                                            And My Flash Lip Sync


Thursday 8 November 2012

From Sketches to Simulation...


In this render shot, I have modeled and textured the USSR Sputnik_1 artificial satellite. Again, with this model I wanted to tell a story on my moon. This sputnik's been here a long time, and it has aged, it's developed rust and it has been disbanded - much like the rocket ship in my scene, I want my spacecrafts to tell their own story in the environment. This for me, makes play a more interesting environment than if I were to have a glossy, brand new sputnik. It also works well with the lighting that is current in the scene. Alongside the rocket, I wanted to create something else that, had a weathered, artificial/man made look to it, that would be distinguishable against the almost untouched, natural lunar surface that has been designed to look unspoilt by man and completely natural and I think adding sputnik to the scene captures that In a really nice way. I have then imported a matte backdrop for the moon into the shot, just to make my displacement map look like it doesn't drop off of the scene. It looks more continuous which really builds on top of the illusion.


Friday 2 November 2012

Rocket


On this UV, I wanted to establish a Universe built around my Norman segment of film. So as I have now decided to insert a rock into my Lunar scene, I thought a really interesting way to do this would be to advertise a fictional corporation on the rocket. Named after my Surname "Hudson: Space Dynamics for the Future" with the flag of my home in South Yorkshire, England. I thought this would establish a more personal touch to my rocket prop too, and I could have a little more fun creating the UV Map as I have. The Black dot on the right area of the map is where the window will be. The basis of "Hudson Space Dynamics" is essentially the future of safer, energy efficient space travel and my rocket in my Maya scene is the very first Hudson rocket; and I wanted to follow that through with the design aspect of the model. Some of the very first rockets looked very retro, and that retrospective followed through in both Cinema and Saturday Morning cartoons and I wanted to bring that aesthetic through into my design.


On Maya, up to now, it looks something a little bit like this...


After a few more little render tests, I decided that I liked my rocket better without the rocket boosters, so I decided to stick with an aesthetic that the rocket on my lunar surface had been there for quite a long time in a landing position. It had long expired been in a temporary position and for me, that add's depth to the environment which allows the layout to tell it's own story, as well as for Norman and his performance to tell his. So below, I have my render pass for my rocket Prop.


Sound Design Image to Music video


Sunday 28 October 2012

Development on Moon Surface Lighting


In these render's of my surface, I have been playing around with my lighting with a bloom effect. The top image has Bloom effect at 75% of maximum whereas the middle has it at 50% of maximum and the bottom at 20%. I am happy with the 20% render, and it will be the one I use, because it picks up enough light and dark, tonally without being biased on either end of light or the darkness. The bloom allows me to replicate the actual conditions on the moon, where the sunlight bounces off of the lunar surface but due to the lack of lit area's for the light to bounce back to it lingers over the lunar area; giving a very distinctive look that it has been key to capture. I also have a Spherical UV Mapped background that immerses my environment below. The image I designed myself on Adobe Photoshop to correctly fit around a Polygon sphere.

In Progress


The entire map 


                                                          Zoom in of above image


The two together... 


I did decide that the purple hues were not the direction I wanted to take. I want to acheive a more Green/Blue tint in my intersteller background that I could use in constrast to what I had modelled in Maya and how I intend to set up the lighting. So below is the final Render from Photoshop of the Backdrop that is to be used in the final film.


NOSTALGIC, IMMERSIVE Camera Fiducial's and other artisttic little touches...

In regards to my visual development, I'm wanting to create a key, distinctive twist on something instantly recognizable that I can toy with and make my own. I'm very confident with the Moon surface that I have created. But it's all now about building and building on top of that to create more of an atmosphere (No punn intended). So whilst doing my research, I looked at a lot of Apollo 11 (1969) photography produced by Aldrin and Armstrong on the Lunar surface and you can plainly see the fiducial crosses that the lenses produce on the photo's, so I have created myself a few little fiducial's to composite into my scene in Post Production when the Maya scenes have been rendered out. Minus the black background, these are what I have created. They are at an opacity level of 45% as so the scene will seap through and mingle with the crosses in a way that won't allow these fiducial's to distract from the action in the sequence.


Thursday 25 October 2012

Wednesday 24 October 2012

Moon Surface Render Pass


This is the surface of the Moon where most of the Performance and action in my scene is going to take place. While it looks like a basic plane mesh, It's actually been a difficult road to get it here. First of all, the initial levels and higher ground and lower ground area's were simply made in Maya and then exported to Z Brush. In Z Brush, I had a lot of fun being able to digitally sculpt in the craters and the natural/raw texture that the plane has - whilst facing the challenges of learning the Z Brush interface which has been an unprecedented journey for me. Getting that wonderful sculpt back into Maya and getting it back in there efficiently and how I artistically wanted it was the most difficult part. There's a lot of thing's that have to be played around with in regards to exporting all of the detail from Z Brush and getting that back into Maya. The detailed texture itself is a texture Map. This is known as a Displacement Map, and then on top of this there is a really cool velvet texture that I have found through external sources, so it's not a Maya preset. But that gives my environment a really nice and grainy but eased out look that compliments my rugged natural landscape. So really, we have a basic mesh plane with 2 Textured UV Maps laid over to give the artistic representation that I really really desired. I can say I am more than happy with the result! It's been something I have had to persevere with but my artistic representation of the Lunar surface has come into fruition!

Tuesday 23 October 2012

Moon Layout Original Floor Plan to Z Brush Renders


The original floor plan sketch that I produced. As a colour key, I tried to paint this in as though I was creating a displacement map as so it would be easy to read and I knew specifically what I wanted to create. The lighter grey area's highlight the high-land points in the terrain, where as the darker parts demonstrate where the terrain dips downhill. The craters are the circular area's, however as they dip in at various lengths and each crater is different to the other, it's important to retain that Natural looking illusion that I want to capture. 


The first two Birdseye views are my surface layout which will play as the stage for my character performance. The image above, which is a whole-Moon sculpt will be situated in my wide/long shots. The last two images have a started mid-grey texture, unlike the first one which is just a screenshot of the finished sculpt with a default lit texture. 

Monday 22 October 2012

Colourscript, Colour Key Palette's & Production Design


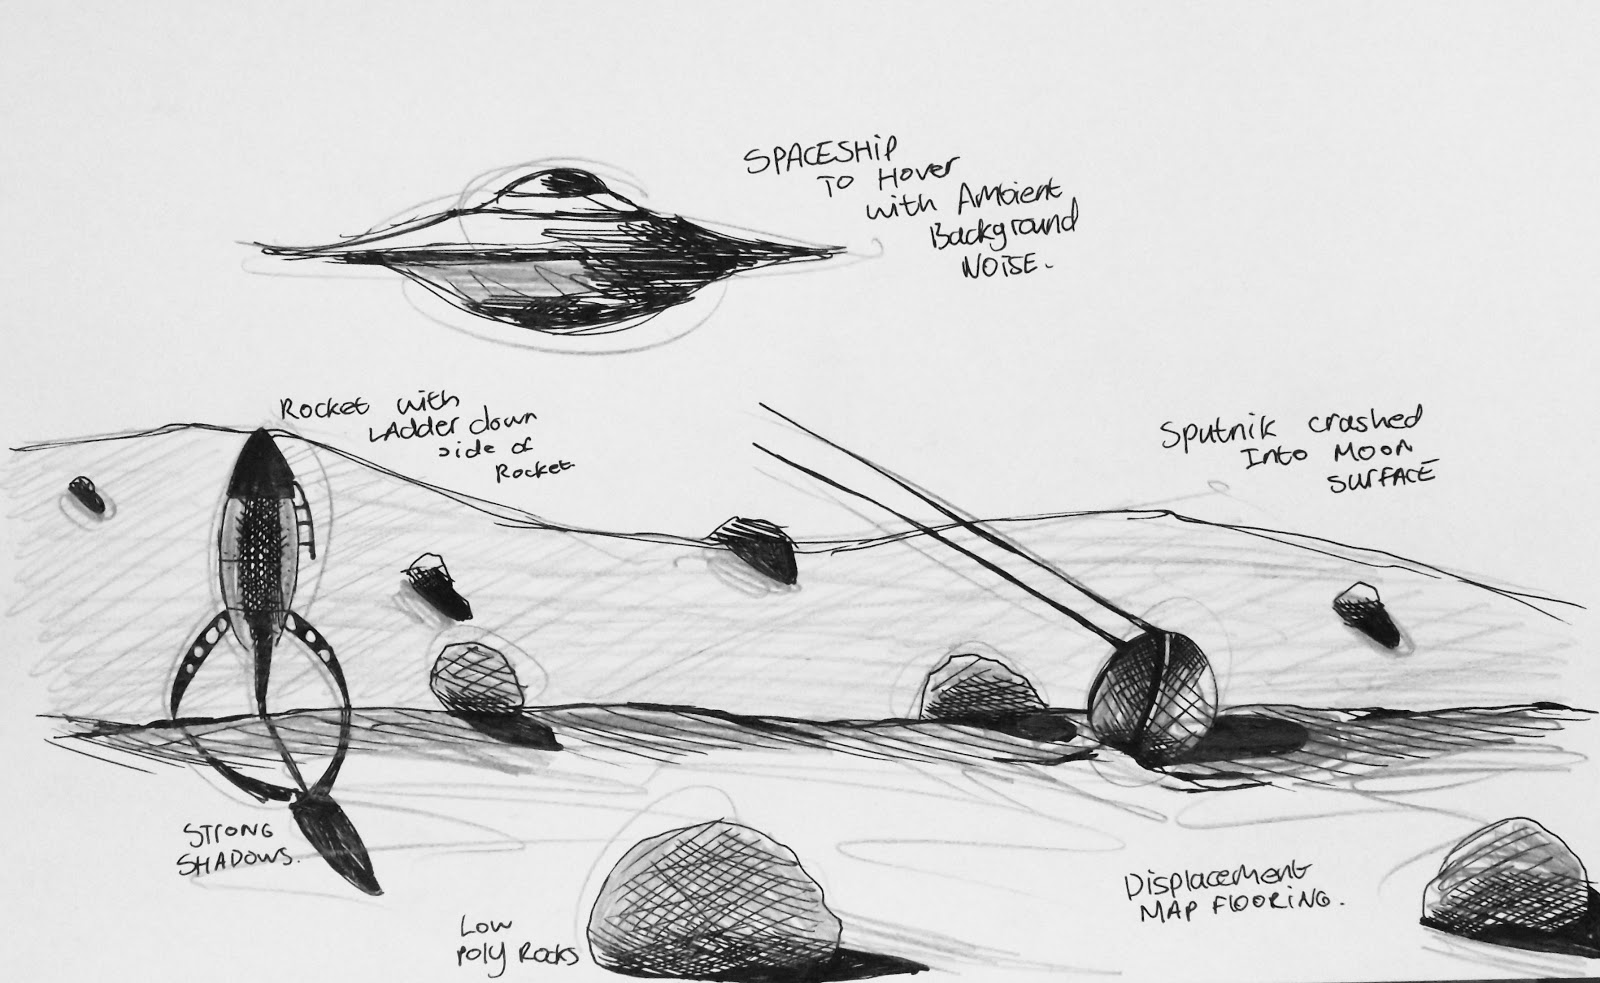
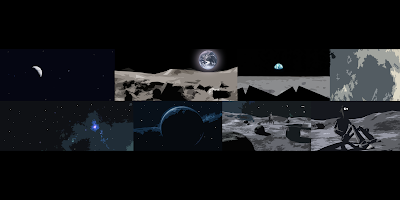
Above is the colour script that I have sketched and then digitally painted in Photoshop. A colourscript is a roadmap for the way colour will be applied throughout my film. It allows me at a glance to see what mood's and feelings I can evoke from a single frame, and the colours and lights that compliment the evoking. It also allows me artistically to try and see where I can fullfill my vision and where I may be going wrong; and it will be a wonderful visual reference for when I am lighting my scene. Colour was always integral in setting the tone of the film here and conveying the right atmosphere. Space is a dangerous, negatively lit place. Stylistically, I have to bump it up visually in comparison with how it looks in real life so I can touch on the moods I want my audience to feel. In reality, from my research, from the moon imagery, to stand on the moon in real life is nowhere near as extravagant as what i'm hoping to acheive which as an artist and a storyteller, I think will give me tremendous freedom that I enjoy exploring. 

Colour Keys 


The reason Iv'e gone with these secondary hue colours is because not only do I want to try and play around with the colour palette of space, and create something new and refreshing, I want to bring in a colour aesthetic that really stuck by me as a child from Disney's Sleeping Beauty. The colours in that film and the way they are used to elicit moods and emotional responses from an audience and the atmosphere it builds for the film as a whole is something that has always stuck by me but iv'e never really used that form of inspiration before to work with such diverse colours. Here I thought would be a great time to start as i'm not tied down to reality in such a way that I have to follow certain logical laws. I do have a bend of freedom that I feel confident I can enjoy and experiment with. 


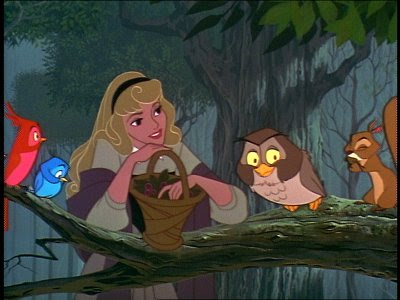
One of my all time favorite favorite Disney animated films "Sleeping Beauty" employs a powerful colour palette that defines itself against it's predecessors and the Disney films that follow. Stylistically, it stands apart and this is purely on design, lighting and colour.  


Minority Report is another stylistically brilliant film that is overly lit and photographically over-exposed in area's but I love the colour palette and the artistic lead that the film is trying to inform us that the film is so brightly flared in places because the future itself is far too glossy and spectacle to contain is the cinematic frame. This, is another example along with other science fiction films that ground them in their genre.